
Enhancing the longevity of your roof begins with impeccable tile roof underlayment installation. Craftsmanship at this stage ripples through the entire roofing structure, ensuring its resilience against weather and wear. The advantages of a well-executed underlayment extend beyond protection, encompassing thermal regulation and energy efficiency. Before your tiles take center stage, the underlayment assumes a pivotal role in safeguarding your investment. The meticulous application of underlayment acts as a formidable barrier against moisture intrusion and leaks. It prevents the onset of potential rot, decay, and interior damage, lending your roofing structure resilience in the face of nature’s elements.
Beyond mere protection, a methodically installed underlayment spells an array of benefits for your roofing system. By ensuring a seamless underlayment foundation, you establish an efficient thermal barrier that aids in temperature moderation. This, in turn, curtails energy costs while providing optimal comfort indoors. Furthermore, a precise underlayment installation bestows dimensional stability, mitigating potential warping or buckling of tiles, resulting in a visually appealing and structurally sound roofing ensemble.
STEP 1: Gather Tools and Materials
To begin your successful tile roof underlayment installation, assembling the necessary tools and materials is paramount.
Sourcing the Essentials
Start by procuring the fundamental tools, including a tape measure, chalk line, utility knife, and a claw hammer.
Underlayment Selection
Opt for a high-quality underlayment material such as rubberized asphalt or synthetic underlayment, ensuring its compatibility with the chosen tiles.
Fasteners and Nails
Acquire corrosion-resistant nails or screws, specifically designed for roofing projects, to secure the underlayment effectively.
Safety Gear
Prioritize your safety with gloves, non-slip footwear, and eye protection.
Flashing Materials
Obtain appropriate flashing materials for vulnerable areas like chimneys, vents, and valleys.
Tile Adhesive
Depending on your tile choice, select a reliable tile adhesive to ensure long-lasting adherence.
By thoughtfully amassing these tools and materials, you lay the foundation for a seamless tile roof underlayment process, safeguarding your roofing investment for years to come.
III. Choose the Right Underlayment
STEP 2: Prepare the Roof Surface
Before installing the tile roof underlayment, it’s essential to ensure the roof surface is properly prepared. This step sets the foundation for a successful installation. Start by clearing the roof of any debris, leaves, or loose shingles. This clean slate provides a smooth base for the underlayment and prevents unevenness. Next, inspect the surface for any nails, staples, or protrusions and remove them carefully. These small obstacles might interfere with the underlayment’s integrity. Once cleared, examine the roof for dips or valleys and address them as needed. A level surface ensures uniform underlayment placement. In case of any visible damage or deterioration, make the necessary repairs before moving forward. Lastly, consider applying a suitable primer if your underlayment requires it. This aids in the adhesion process and enhances the longevity of the installation. By meticulously preparing the roof surface, you set the stage for a seamless and effective tile roof underlayment installation.
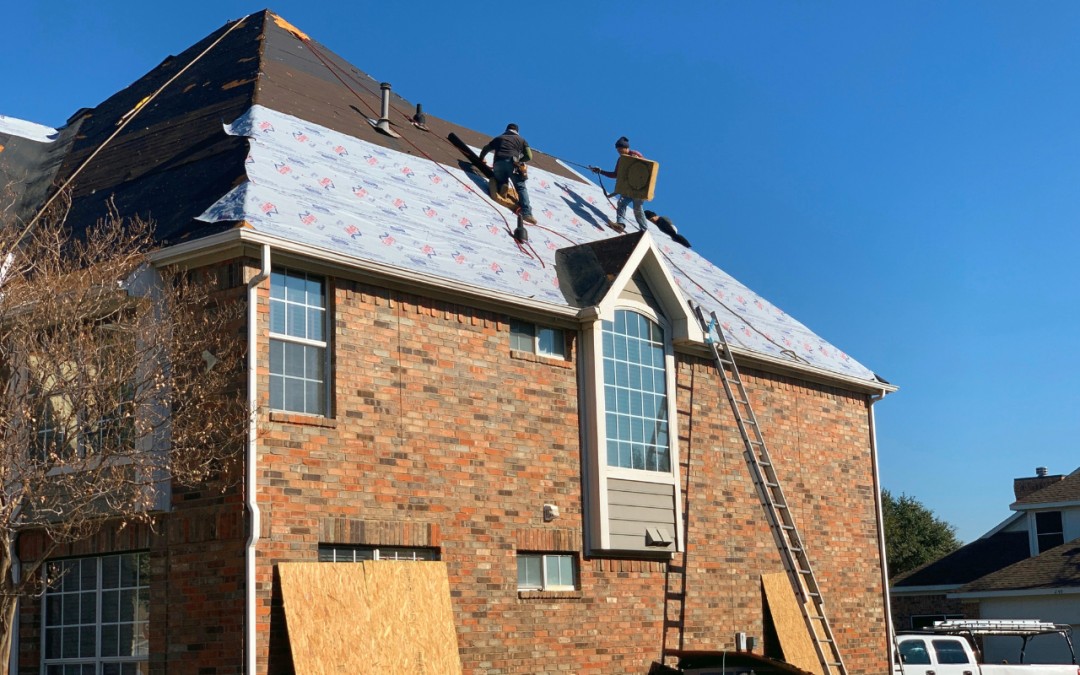
STEP 3: Install the Underlayment
Proper installation of the underlayment is a pivotal step in ensuring the longevity and effectiveness of your tile roof. Begin by cleaning the roof deck to rid it of debris and ensuring a smooth surface. Next, roll out the underlayment material, starting from the bottom and progressing horizontally with a slight overlap. Secure it firmly with nails or staples, adhering to manufacturer guidelines for spacing. Be meticulous around roof penetrations, like vents and chimneys, ensuring the underlayment tightly conforms. Use a breathable underlayment for optimal ventilation and moisture control. Once laid, inspect for wrinkles or creases that can trap water. Lastly, check the edges and seams for proper alignment, making necessary adjustments. A meticulous underlayment installation provides a solid foundation for your tile roof, enhancing its durability and performance over time.
STEP 4: Ensure Proper Sealing and Ventilation
To achieve a flawless tile roof underlayment installation, paying attention to sealing and ventilation is paramount. The interplay of weather and moisture makes impeccable sealing a priority. By meticulously sealing all joints and edges, you create a robust barrier against water infiltration. This involves using high-quality sealants that adhere firmly to the underlayment and tiles. As for ventilation, it’s the unsung hero of a long-lasting roof. Effective ventilation prevents excess heat buildup in your attic, which could compromise the integrity of the underlayment and tiles over time. Incorporating ridge vents and soffit vents ensures a balanced airflow that not only extends your roof’s lifespan but also optimizes energy efficiency. Remember, a well-sealed and adequately ventilated tile roof doesn’t just enhance durability—it safeguards the entire structure with finesse.
STEP 5: Inspect and Verify
Ensure Accuracy
Before moving forward, validate the accuracy of the underlayment placement. This step involves a meticulous examination to guarantee that every section aligns seamlessly, minimizing the risk of future complications.
Verify Adhesion
Thoroughly inspect the adhesion of the underlayment to the roof structure. Proper attachment is imperative to fortify the foundation of your tile roof, enhancing its longevity and resilience against environmental factors.
Assess Overlapping
Carefully assess the overlapping of underlayment sections. Proper overlapping creates a reliable barrier against moisture infiltration, a pivotal aspect in safeguarding the integrity of your tile roof system.
Confirm Alignment
Double-check the alignment of underlayment layers. Precise alignment contributes to uniform protection, preventing vulnerable spots that could compromise the overall effectiveness of your tile roof installation.
Inspect Perimeter
Lastly, inspect the perimeter and edges of the underlayment. This detail-oriented examination ensures comprehensive coverage, leaving no room for vulnerabilities and reinforcing the shield that underlayment provides to your valuable tile roof investment.
Incorporating these five essential steps into your tile roof underlayment installation process ensures a robust foundation for your roofing structure. From meticulous preparation to accurate alignment, each step contributes to enhanced durability and protection.
Publisher’s Details:
Best Roofing
77 Buff Ave, Pasadena, CA 91107
(866) 517-1835
info@bestroofingla.com
bestroofingla.com
In line with proper tile roof underlayment installation, it’s crucial to consider various factors before planning a new roof installation. Read: Consider These Factors When Planning A New Roof Installation. For premium roof installation services in Santa Clarita, CA, they stand out for their exceptional expertise and the best-in-class solutions they offer.
<iframe src=”https://www.google.com/maps/embed?pb=!1m18!1m12!1m3!1d3301.9433548809334!2d-118.07306259999999!3d34.1477913!2m3!1f0!2f0!3f0!3m2!1i1024!2i768!4f13.1!3m3!1m2!1s0x80c2dbf0130f0351%3A0x5e22f88ba52ce729!2sBest%20Roofing!5e0!3m2!1sen!2sph!4v1683550652513!5m2!1sen!2sph” width=”600″ height=”450″ style=”border:0;” allowfullscreen=”” loading=”lazy” referrerpolicy=”no-referrer-when-downgrade”></iframe>